How to use yoga wheel
If I say yoga accessory, you naturally think of the yoga mat, maybe the yoga brick and possibly the straps. But certainly not the yoga wheel, right?
This accessory is spreading like wildfire, so much so that some yoga studios focused on flexibility work are using it. The yoga wheel is a narrow but wide cylinder made of plastic or wood.
Yoga wheel
It can be used to deepen a stretch, to bring an imbalance or on the contrary, to provide extra support on difficult to access poses.
Let's see together how to easily integrate this accessory into your postures, starting with floor asanas. We'll keep the inversion and balance postures that rage on Instagram for a little while longer!

1. CHILD'S YOGA WHEEL POSTURE (BĀLĀSANA)
The child's posture is a great classic that is meant to be both restful and helps provide stretching at the hips, thighs and lower back in a gentle manner.
Incorporating the yoga wheel by placing your arms forward on it (you can also use a small stool) will allow you to feel an additional pleasant stretch in the shoulders and chest area.
How to proceed :
• Kneel on the floor with your big toes in contact and sit on your heels.
• Put your knees away from your hips and place the wheel between your hips.
• Place your hands on the wheel, breathe in, then as you breathe out, lean your torso forward, using your hands to roll the yoga wheel away from your body while stretching your spine, smoothly.
• Continue leaning forward until your belly rests comfortably between your thighs with your arms stretched straight out in front of you.
• Let your head and neck relax, aiming to rest your forehead on your mattress while your chest and shoulders stretch deeply.
• Take at least three deep breaths while maintaining your posture.
2. EASY POSTURE (SUKHASANA) WITH THE YOGA WHEEL
The easy pose is a classic sitting position with crossed legs that is meant to be pleasant.
Here we will take advantage of the addition of the wheel in the back to move from a sitting position to a lying position, in order to stretch the spine again and open the chest to relieve the tension between the shoulders.
How to proceed :
• As Adriene shows you in the video above (version without the wheel), sit up straight, with the yoga wheel on your back.
• Cross your legs in a comfortable position so that your legs and pelvis are firmly anchored in the ground.
• Place your hands on your knees, palms up and close your eyes. Inhale deeply and as you exhale, slowly extend your spine over the wheel, gently tilting backwards.
• Let the back of your head rest on top of the yoga wheel.
• Take up to five deep breaths, minimum, before moving up.
3. ASSISTED HALF-PYRAMID POSTURE (ARDHA PARSVOTTANASANA)
Here's a great way to fight stiff hamstrings.
If the pyramid posture is still the best, the half-pyramid posture assisted by the yoga wheel is another very valid option!
How to proceed :
• Put yourself in the official "proposal" position with one knee on the ground and the second knee at 90°, with your foot flat on the ground.
• keeping your chest out and straight, place the yoga wheel under your thigh with your leg forward, the wheel should be in contact with your calf.
• now the technical part, lift your front leg to position your calf ON the wheel then roll the wheel forward with both hands so that your leg is fully extended (the yoga wheel now has only one point of contact with your body, close to your ankle).
• flex your front foot and take a deep breath while stretching your spine.
• Then, as you exhale, bend forward from the hips and grab your front ankle with your hands while keeping your back straight.
• Take three to five deep breaths before repeating two or three times. Repeat on the other side.
4. POSTURE OF THE LIZARD (UTTHAN PRISTHASANA) AT THE WHEEL
The lizard posture is a variation of the lunges, a very good position to stretch the quadriceps and hip flexors while strengthening the lower body.
With the "lizard" version of the lunges we will benefit from an additional opening of the hips. With the wheel, it's not much different from the classic version, except that there will be a little extra difficulty: balance!
How to proceed :
• In the "proposal" position as before, lift your back foot off the mat and place the yoga wheel under your ankle for support.
• inhale and engage your abdominal strap.
• as you exhale, lean forward with your hands on the floor inside your feet.
• inhale and press firmly on the wheel with your back foot and as you exhale, lift your back knee off the floor by rolling the wheel to extend your back leg.
• from there, press your palms firmly to the floor, point your toes and try to stretch your spine as much as possible.
• Hold the position for three to five breaths before releasing and switching sides.
Note: you can let your front knee fall outwards for a deeper opening of the hip.
5. RAVEN (BAKASANA) POSTURE TO THE YOGA WHEEL
You may already know the posture of the raven and then you know how difficult it is to control it.
It is indeed a posture that requires a lot of balance, body awareness and strong abs! Fortunately, the wheel will help us to master the movement.
How to proceed :
• Place your hands and feet on the mat and bring your wheel towards your feet.
• Anchor your palms firmly in the mat and spread your fingers well apart.
• suck in your belly button while contracting your abdominal strap and at the same time place the top of your feet on the wheel.
• Extend your legs by rolling the wheel backwards (you are now in the board position) then bring your knees back towards your arms.
• Repeat these back and forth several times to familiarize yourself with the movement of the wheel and get a good abdominal workout.
• finally, when you bring your knees back to your arms for the last time, lift them up as much as possible in the air by raising your buttocks "to the ceiling" (see at 1:20 of the video) then come and place your knees against your arms, above your elbows.
• now lean forward, your feet leave the wheel and you are in balance, hold on as much as you can!
• Crouch behind the wheel, your feet pressed together, allowing your heels to come off the ground.
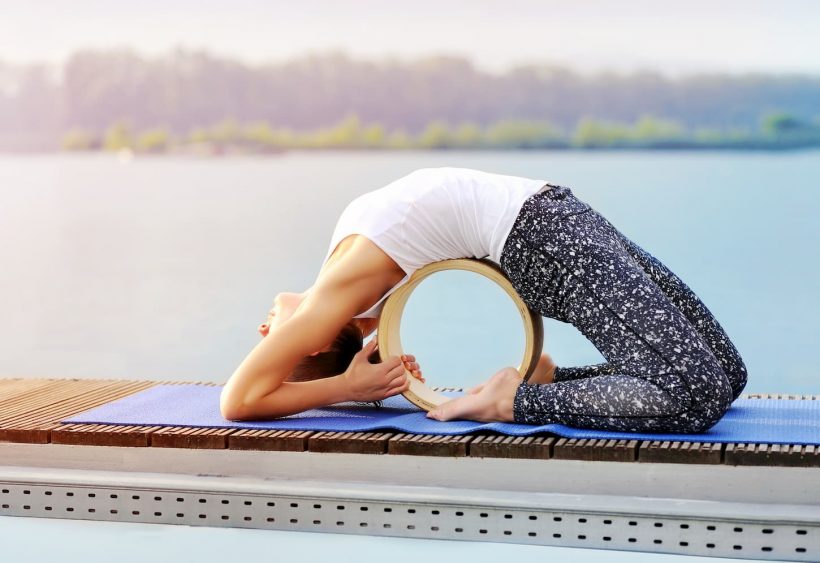
6. PIGEON POSTURE AT THE YOGA WHEEL (ADVANCED)
The postures are a little more advanced for yogis who want to go further in stretching the spine.
Go gradually and carefully. For postures such as the pigeon or even the wheel, the Yoga wheel will offer considerable help and support.
How to proceed :
• Sit up straight, knees bent, feet flat on the floor, directly in front of your yoga wheel aligned with your spine.
• Place your hands inside the wheel to hold it in place.
• As you breathe in, lean back against the wheel and release your hands, gradually lie down on the wheel and release the back of your neck.
• Now we come to grip the wheel again with our hands, stretching our arms as much as possible and sending our elbows towards the ceiling (see at 1:05 of the video above).
• In this position, try to release all tensions in your body and take a few deep breaths.
You can see that this posture offers a complete stretching of the body (shoulders, chest, hip flexors) while developing back flexibility.
7. POSE THE FISH WITH A WHEEL (MATSYASANA)
The fish pose is an excellent posture to relieve stiffness in the neck and stretch the spine.
For those who are not able to do it in its classic form or who want to go even further in this stretching, there is only one solution: the yoga wheel (yes again)!
How to proceed :
• Sit on your mat with your legs bent and your feet flat in front of you. The wheel is in your back.
• Holding the wheel so that it doesn't escape, press down hard on your heels to lift your buttocks, press your back against the wheel and bring your hands behind your head to the mat.
• From there, roll your back on the wheel and adjust your feet to bring your shoulders to the ground. The top of the wheel is now on your buttocks.
• Now you can send your outstretched legs into the air, one after the other, holding the wheel on the outside with your hands.
• Take several deep breaths, then put your feet back on the ground and return to your original position.
I hope you enjoyed this initiation to the Yoga Wheel and that you were able to discover a tool that I consider excellent for home yoga.
I invite you to get your Yoga Wheel and start following complete flows like this one on it.
We have mainly seen stretching postures today, but be aware that it is also possible to work on balance with the wheel. Namaste.